
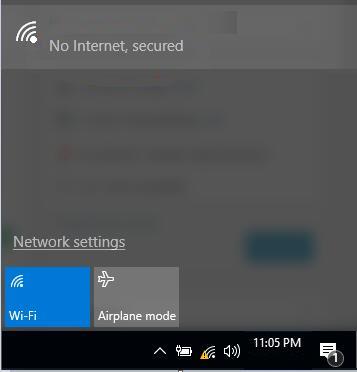
Life without the Internet is impossible and even though we have unlimited high-speed Internet, there are times we encounter errors on devices we use. And cause our day to come to a standstill. One such error that occurs when connected to Wi-Fi is No Internet, Secured. Literally, this means although you have a secured connection to your router, but still, you cannot access the Internet. This error will be denoted by a yellow triangle on your wireless icon in the right-bottom corner along with other icons.
The exact reason for this age-old error is due to Invalid IP address configuration settings. There are a few reasons as to why that could happen:
- A manual change in IP address configuration settings.
- Windows Updates may sometimes alter certain settings that may cause this issue.
- Any third-party program that has the required permissions to change your internet settings can also modify IP configuration.
Now before you start troubleshooting this error, there are a few simple steps that you need to take.
- Restart your Router, and check your connection again.
- Check if other devices connected to the same internet are working fine.
If the internet is also not accessible on any other device, then it is time to contact your ISP. Else, you can follow these easy and quick steps to resolve this error:
Steps to fix Wi-Fi – No Internet Secured in Windows 10.
Method 1. Use the Windows 10 Trouble-shooter.
Microsoft has developed a Trouble-Shooter in Windows 10 which automatically detects and fixes the issue. The first step would be to let Windows determine and fix the issue on its own. To run the network troubleshooter, follow these steps:
Step 1. Press Windows + I to access the windows settings and choose Network and Internet.
Step 2. Locate Network troubleshooter on the right side of the window, and click on it.
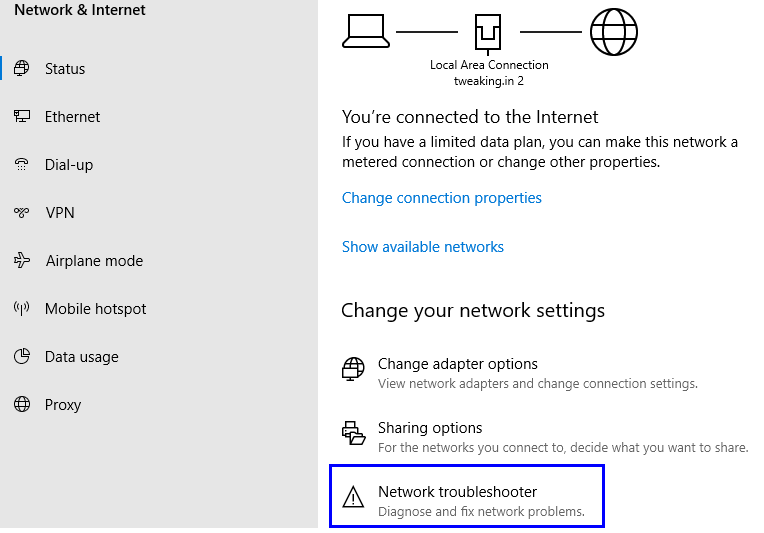
Step 3. This will initiate the Troubleshooter. Follow the instructions and Windows will automatically fix the issue if it can identify it correctly.
This should resolve your Wi-Fi No Internet Secured issue in Windows 10.
Method 2. Turn off your VPN.
VPN stands for Virtual Private Network, which masks a public network with a private network to maintain the privacy of the data transmission across the internet. If your laptop displays error, No Internet Secured while connected to Wi-Fi, then you should consider disabling your VPN.

VPN connects you to a private server while surfing, and if the private server goes offline for any reason, then all the connections connected to that server would also be disconnected from the internet. Try the following steps:
- Disable the VPN and try connecting to the internet. If you are still offline, then skip to Method 2.
- If you can go online, then enable the VPN, and try to connect with a different server.
- If you still cannot connect, then you will have to contact the VPN support as your computer can connect to the Internet without using a VPN.
Method 3. Refresh the Windows 10 Internet Protocol Configuration
The next step you must take if you are facing the No Internet Secured error on your Windows 10 laptop, then you can try to refresh the internet Protocol configuration of your computer by following these steps:
Step 1. Type Command Prompt in the search box, located on the left-bottom corner of the screen.
Step 2. Right-click on the Command Prompt and from the small list of options, choose Run as Administrator. This will open the Command Prompt in Admin Mode.
Step 3. Type “Ipconfig/release” and wait for a few seconds.
Step 4. Once the command has run successfully, type “Ipconfig/renew” and let this command execute.
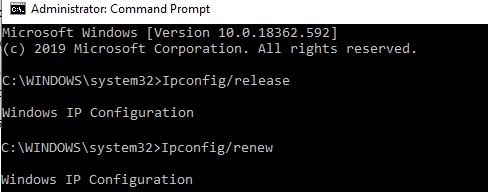
Step 5. This command will provide a new IP address to your computer and refresh the connections.
Note: If you try these commands on your computer connected to the internet, then you will be disconnected immediately. You will then have to type the second command to reconnect.
Method 4. Reset Winsock
Windows Sockets API or Winsock is a specification that determines how the Operating system and the applications installed would handle the Input and Output requests related to the Internet. A reset of Winsock would refresh the sockets and re-establish the internet connection. It is an important step while trying to resolve the No Internet secured error on your Windows 10 PC. To reset the Winsock:
Step 1. Open Command Prompt in Administrator Mode.
Step 2. Type netsh Winsock reset catalog in the Command Prompt.
Step 3. Restart the computer for the changes to take effect.

Step 4. Your Laptop will connect automatically after the restart. If it doesn’t then open the network settings, and select your network and right-click to connect.
Method 5. Check Local Area Connection Properties.
There are a few settings that must be enabled on your computer for you to connect to the internet. As your internet was working fine prior to the Wi-Fi No Internet secured error, and you did not make any changes in your computer, there are fewer chances that this may be the issue. But there is no harm to verify the settings, and it would hardly take a couple of minutes. To check the settings:
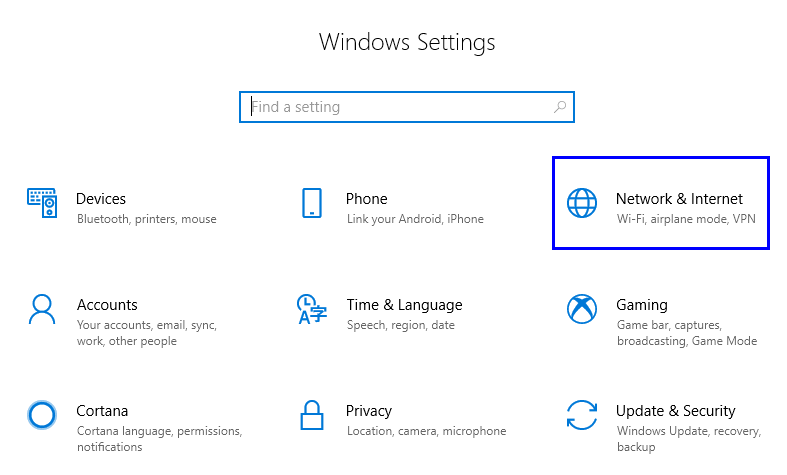
Step 1. Open Windows Settings by pressing the Windows key + I together on your keyboard.
Step 2. Click on Network and Internet from various options.
Step 3. Locate Change Adapter Options on the right- side of the Settings window, and click on it.
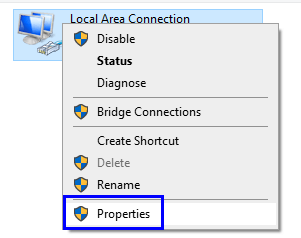
Step 4. A list of your Network Connections will be displayed. Choose your connection and right-click on it.
Step 5. From the list that appears, choose Properties.
Step 6. Under the title “This connection uses the following items”, check if the following items checked:
- Client for Microsoft Networks
- File and Printer Sharing for Microsoft Networks
- Internet Protocol Version 4 (TCP/IPv4)
- Internet Protocol Version 6 (TCP/IPv6)
- Link-layer Topology Discovery Responder
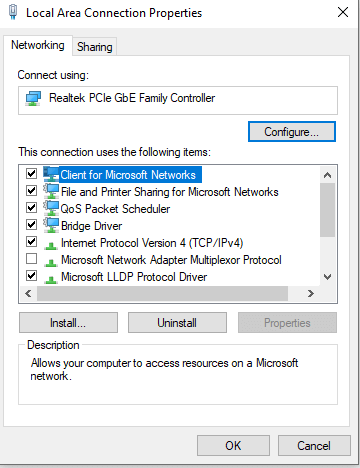
Step 7. Click the OK button. Restart the computer only if you have checked any items that were not selected before.
Method 6. Disable Internet Protocol version 6 IPv6
Internet Protocol is also known as an Internet address, a bunch of unique numbers assigned to a device connected to a network. This way every device can be identified with its IP address. IPv6 is an upgraded standard used over IPv4 and is not yet fully error-free. Most of the computers across the globe use IPv4, though IPv6 is always turned on. One solution for the No Internet Secured error on your Windows 10 computer could be to uncheck the IPv6 setting and turn it off.
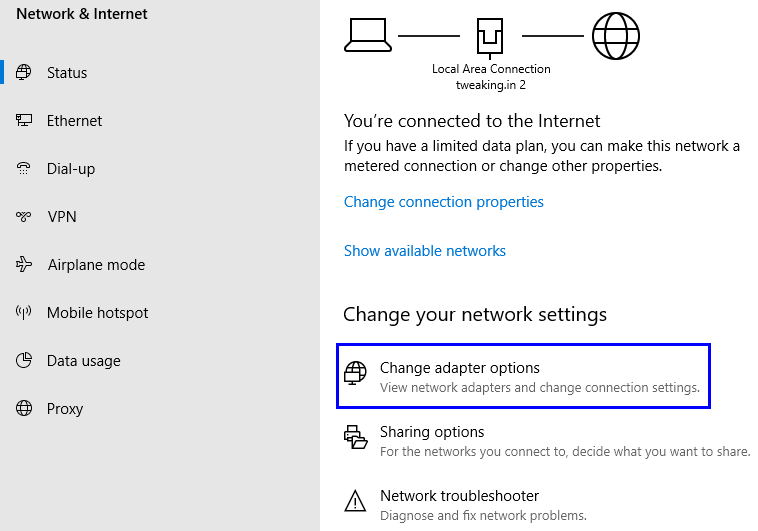
Step 1. Access the Windows Settings by typing Settings in the search box on the taskbar.
Step 2. Choose Network and Internet from various options.
Step 3. Click on Change Adapter Options on the right side of the Settings window under Change Your Network Settings.
Step 4. A list of your Network Connections will be displayed. Choose your connection and right-click on it.
Step 5. From the list that appears, choose Properties.
Step 6. A new window will open. Use the scroll bar on the right to scroll down until you locate an item labeled as Internet Protocol Version 6.
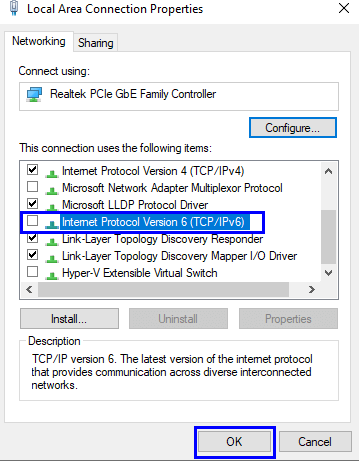
Step 7. Uncheck the box next to it and click on OK.
Step 8. Restart the computer.
Method 7. Update Your Network Device Driver
A driver is a small program written in low-level machine language, which communicates between the operating system and the hardware. If you want your computer to get connected on the internet, then it must have a compatible network card. Updating the driver will ensure that the device works properly. To update the driver, follow the following steps:
Step 1. Press the Windows key on your keyboard and start typing Device Manager. The results in the start menu will display the Device Manager app.
Step 2. Click on the app and from the list of drivers locate Network Adapters.
Step 3. Expand Network Adapter by clicking on the arrow on the left.
Step 4. Select your network device, and right-click on it.
Step 5. From the small list of options, choose Update Driver.
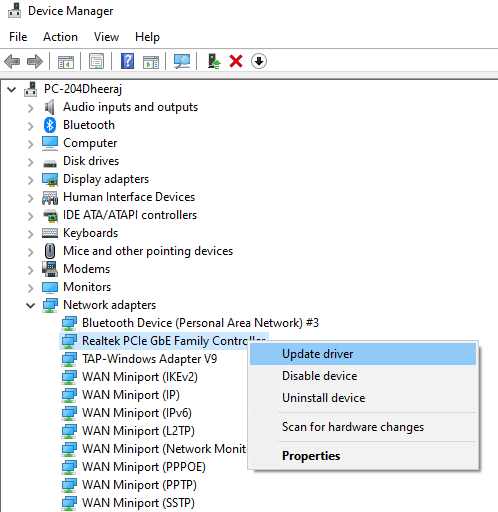
Step 6. Follow the on-screen instructions, and reboot your computer.
This should get your computer connected to Wi-Fi, and resolve No Internet Secured error on Windows 10.
Your thoughts on Steps to fix Wi-Fi – No Internet Secured Error On Windows 10.
The above-mentioned steps can not only help to fix the Wi-Fi No Secured Internet but also you can try them to fix any other Internet-related issues. These steps can help you refresh the Internet Protocol, Reset the Windows sockets, Update the network adapter and more. You may not be facing this issue right now, but it would be wise to bookmark this page, in case you need it in the future. Also, do subscribe to our Systweak Blogs and YouTube Channel for resolution on Tech issues and articles highlight hidden features on Windows 10.