
Custom Android ROM is a smartphone firmware and it is based on Android platform. Android is an open source platform that’s why all developers have the leverage to edit the code, recompile and release it again for a wide variety of devices.
If you want to personalize your device’s appearance and behavior, then you can install custom ROM. These ROMs are developed by Android community and most of them are completely free. Custom ROMs are available for all most all devices such as smartphones, smartwatches, tablets and more which run on Android. Android comes with Stock ROM or Stock Firmware, which is a preinstalled OS. Stock ROM offers the functionality defined by the manufacturer. By adding custom ROM, you can get some extra features and also improve the performance of the device.
Most of the Android users don’t try to install Custom ROM, however people who want their device’s performance to increase and get access to extra features.
Let’s take an overview of the benefits of installing Custom ROM:
Performance
When you get a smartphone, it’s clock speed is set to provide better battery life and optimal heat. However, on installing custom ROM, you will be able to increase the clock speed, hence increasing the performance. These changes will help when you play graphic intensive games. Moreover, as ROM removes bloatware, which is OEM installed apps, and free up system resources.
Battery Life
Well, now we know we can increase the clock speed, i.e. overclocking. However, you don’t really need fast running processor, you can reduce the clock speed, underclocking. With this, you can get an extended battery life. With custom ROM installed, bloatware is removed and can free up system resources, thus enhancing the battery life with fewer apps running in the background.
 How to Solve Error 502 Bad Gateway?I’m sure you must have encountered ‘502 Bad Gateway’ error at least once. This is quite common & annoying error...
Updates
If you are one of them who are stuck with an obsolete Android OS as your phone manufacturer has cut support of the device you own. You can install custom ROM on newest Android version thus upgrading the software. Some of the custom ROMs get updated daily and those updates are termed as Nightlies.
Customization
Android is one of the most customizable OS and due to it being open source, there are several other options. With Custom ROM, you can change the color of notification light, saturation of colors on your device’s screen, vibration force, and more.
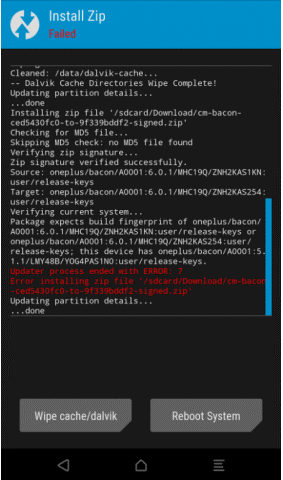
While installing Custom ROM, one can encounter errors. One of the most common errors is Error 7 code for TWRP. Let’s know what it is and how it comes along with the steps to get rid of it.
What if you encounter Error 7″ code TWRP?
One of the most common errors, Status 7 Error, Error: 7 or zip signature verification failed error. Before knowing how to resolve the issue, let us take an insight of What Status 7 Error is
What is Status Error 7?
While installing custom ROM, you might get an error “Error: 7” or “Status 7 Error”. Status 7 aborts the installation process, though it doesn’t harm your device and you can go back to what you were doing.
Why You Face The Error?
While installing LineageOS, or any custom ROM, you need TWRP or custom recovery (CWM) installed, if you are facing this error, you might have missed out some installation steps. Another reason for facing the error could be that you have downloaded wrong file, or the file downloaded is not compatible with your device model.
Now let’s take a look on the steps to resolve the error:
Format and Remove Cache:
One of the best ways to fix TWRP error 7 or Status 7 error is to format the cache partition of your phone. Furthermore, you can format Dalvik cache, format data partition as well. Now, you might be wondering, how? We have listed steps to perform the aforementioned tasks:
- Reboot your device into custom recovery, i.e. CWM (Clockwork mode recovery)/ TWRP (Team Win Recovery Project)
Note: To enter custom recovery, turn off Android first. Once you see the black screen, press Power and Volume Down button for a few seconds. (You can also try this with Power and Volume up button, in case the first one doesn’t work) You will get a list of options.
- Once your device enters recovery mode, select Advanced Wipe and then choose Cache, Dalvik Cache, and Data.
- Wipe selected partitions, if you have TWRP, then you will be prompted to type “Yes” to format.
- Once the process is finished, you can try and install custom ROM.
Eliminate the Assert Checks

If you are sure that downloaded file is right and then you need to remove Assert checks as it modifies ROM package which could be the reason of Status 7 Error. To resolve the issue, follow these steps:
- Locate the ROM package on your computer and open it to view.
- You will be able to access META-INF/com/ google/android directory and double click on it to view an updater-script file.
- Now right click on updater script and open with any Text Editor.
- Locate “Assert” in the updater script. These lines will be written in the script beside the codename of the device.
- In case the codename written doesn’t match the codename of your device, you can change it to the right one.
- Now search for “assert & getprop” and delete them if found.
- Once done, save the file with WinRAR and review the script just to be sure.
Update Your Bootloader To Latest Version on Android Device
If you have an older version of bootloader on your Android, then you might encounter Status 7 error. For example, if you are trying to install Nougat based ROM which has Jelly Bean and you have never updated the OS software. So, before installing custom ROM, upgrade your device’s OS to the latest official and then try again.
Don’t Do Dirty Flashing
People running custom ROMs on Android devices usually try to install LineageOS on it. That’s why the process is not recommended for them, as each ROM is discrete and may create problems while installing. You can only do Dirty flashing on existing ROM provided the previous ROM is based on official LineageOS code or CyanogenMod.
Note: It is advised to back up your data before making any changes. Also, do a factory reset and full data wipe before initiating the process to install custom ROM. All these preliminary steps will prevent the error 7 on Android.
 How to Fix “Google Play Authentication is Required”...“Google Play authentication is required” error is the most regular encountered while downloading apps on Google Play Store. In this...
Latest Recovery Should be Installed
Every version Android comes with new version of recovery. So to support new Android version, you need to update custom recovery. To do that, you can visit TWRP website to get the latest version of recovery for Android device.
This is it! One of these methods will work to fix the Status 7 error and then you can install custom ROM to speed up performance and enhance the battery life of Android device. If you think there could other ways to Fix the status 7 error, then let us know in the comments.
Gavin
hey did you know that some updater-script files also have “getprop” commands, they are the same as Assert