
Ever heard of host files? Most of us often confuse host files with DNS files but they’re actually pretty different. So, before we jump on understanding how to edit hosts file on Mac first let’s understand the basic difference between hosts file and DNS.
Hosts File Vs DNS
Most of us are under a common impression of associating DNS with host files but the fact is they’re a lot different. DNS (Domain Name System) is basically a database or a huge directory which includes a list of which web address name belongs to which IP address.
On the other hand, hosts file are localized to a specific device. So, when we’re talking about Mac hosts file it is a pretty important document which maps hostnames to specified IP addresses. This concept is actually similar to how we store contact names on our smartphone. For instance, the contact name acts as a web address and the phone number is the IP address.
Editing Hosts Files on Mac
When it comes to editing hosts file on Mac, the concept is pretty simple. It’s like simply rerouting the IP address of a specific web address. We’ve often seen a message on browser saying “Cannot find the webpage which you’re looking for” right? This basically happens when a particular web address is linked to an incorrect IP address. It’s just like hitting a wrong number from your cell phone, when we try to reach a contact, the phone rings and still we ‘re unable to connect with the respective person due to incorrect entering of contact details.
Here are a few important benefits of editing hosts file on Mac that’ll help you in understanding this concept in a better manner.
 10 Mac Terminal Commands You Should TryBeyond macOS skin, there’s a whole another world known as Mac command line. This article will describe how to use...
Benefits of Editing Hosts File on Mac
Once we reroute a web address to a specific IP address here are a few perks that you might experience:
Enhanced Productivity: If you’re running a small business, then blocking a few social media websites like Facebook, YouTube, Twitter can help your employees to stay focused on their work.
Network Testing: While developing a new network or developing a new website project, you can reroute the web address to a different IP address so that the real website doesn’t get affected while web development is in progress.
Block Malicious Websites: If you happen to know about any malicious web sites, then rerouting these web pages to a secure landing page can prevent your system from any potential threat.
Increased Speed: As the hosts file are localized to your Mac or a specific device, finding a web page can tremendously speed up your browsing experience as compared to DNS.
How to Edit Hosts File on Mac with Terminal
Before you proceed further on editing hosts file on Mac, make sure you have the administrator privileges of your device beforehand.
- Launch the Terminal on Mac either by via Spotlight search or Finder window.
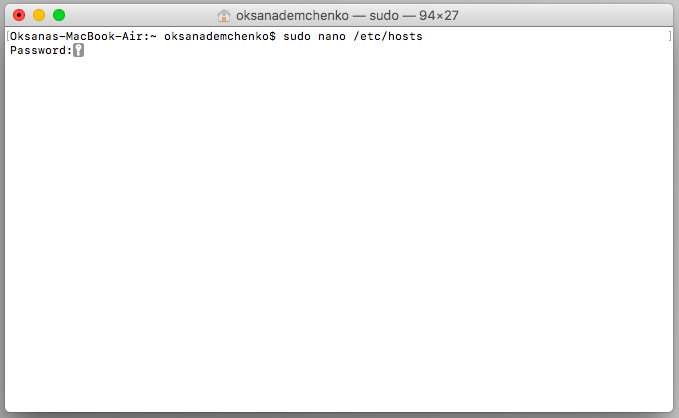
- In the Terminal window, type: sudo nano /etc/hosts and hit enter. This command will allow you to access Nano text editor which is where we edit hosts file.
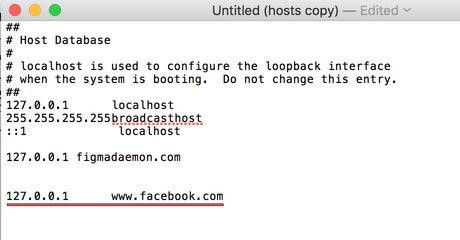
- Now here you need to enter the alternative IP address which you want the website to reroute. Then hit tab and then type the web page address or domain name. Suppose, if you want to block access to a website say YouTube, then enter an invalid IP address first like 001.0.0.100 hit tab and then type www.youtube.com.
- Save changes by tapping Control + O keys and then hit control + X to exit Nano text editor.
- Before you entire move out of terminal window type: sudo killall -HUP mDNSResponder and hit enter to clear all DNS caches.
How to Edit Hosts File on Mac with TextEdit
Another way for editing hosts file on Mac is via apart from using Mac terminal text editor is TextEdit.
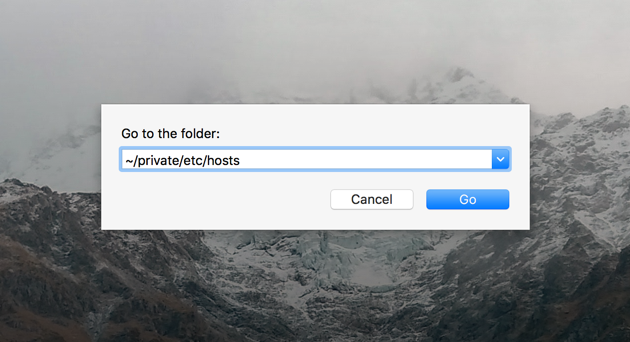
- Navigate to Finder > Go > Go to Folder…
- Now type /private/etc/hosts and tap on Go.

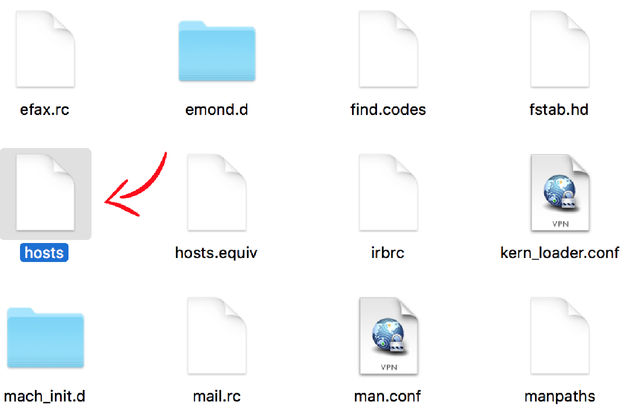
- Copy the hosts file on your Mac’s desktop and then double click the file to make changes.
- Now just like we did on the terminal window, first type in the alternative IP address, hit tab, followed by a web page address.
- Once you’ve made the desired changes in the hosts file, save it and copy it back to the same location from where we fetched it, right back in the etc folder.
- Mac will prompt whether you want to replace this file with the previously existing one. Confirm and proceed further.
 .
.So folks, here was a quick guide on how to edit Mac hosts file! We hope the above mentioned steps will help you in getting through!
For any other queries or feedback feel free to hit the comment box!