Recycle Bin is a system folder that houses all the files deleted from the computer. When a file is deleted, it goes to the Recycle Bin and can be easily retrieved back again. Also, a file in Recycle Bin consumes the same storage space as it did before being deleted. The next step to delete the file entirely and free storage space is to Empty the Recycle Bin in Windows 10.
Many of you would appreciate the two-step process of deleting files. But others would want to delete the files in one shot without having to do it again from the recycle bin. Here are two methods to permanently delete files and bypass the recycle bin.
How To Bypass Recycle Bin And Delete Files Directly On Windows 10?
Method One: Permanently Delete Certain Files

If you wish to differentiate between files that must be permanently deleted and others which you can send to Recycle Bin and delete collectively, later on, this method is just for you. All you have to do is select a file to delete and long-press the Shift button and then press the Delete button. This will ensure that the file deleted by this method will not enter the Recycle Bin and will be permanently removed from the system. However, all other files that are deleted using just the delete button will end up in the Recycle Bin.
Note: Press and Hold the Shit button to remove the file from the system altogether.
Method Two: Permanently Delete All Files.
If you are confident that you wish to remove all files permanently when you press the delete button, then you will have to alter the current default settings and tweak your computer a bit. Here are the steps for the same:
Step 1: Make a right-click on the Recycle Bin icon on your desktop and choose Properties from the context menu.
![]()
Step 2: In the new window, you will have to select each logical drive in your system one by one and click on the radio button next to “Don’t move files to the Recycle Bin. Remove files immediately when deleted.”

Note: The Recycle Bin on Windows 10 is a combination of smaller recycle bins created for each drive.
Step 3: Next click on the checkbox below the option in Step 2 labelled as “Display delete confirmation dialog” to provide a confirmation prompt each time, you delete a file and at the same time remind you that the files deleted will be lost forever.

Step 4: Now, click on the “OK” button, and the changes will reflect instantly. Any file deleted would not give you a prompt, and after a positive response from you, it will delete forever bypassing Recycle Bin.
Advanced Disk Recovery: A Miracle Software
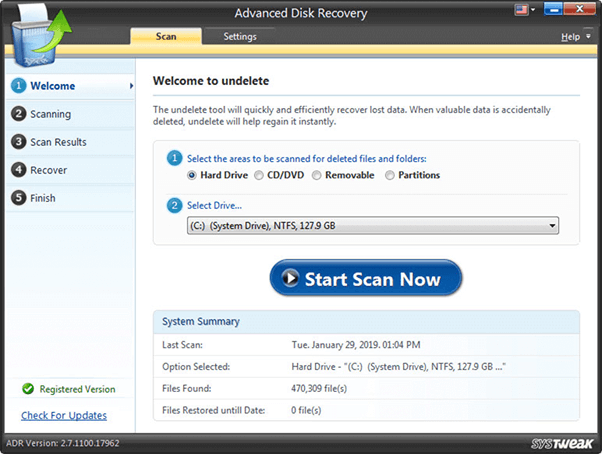
The fact that once the data is deleted from the Recycle Bin in Windows is lost forever is true. However, there is an application that can work wonders!
Meet Advanced Disk Recovery – A fantastic application that can recover most of your deleted files and folders with ease. There is no limit on the amount or type of data it can recover, including photos, audio and video, documents and many other file types as well. Furthermore, it can also scan all the external drives and internal drives and recover the lost data.
Besides data that has been accidentally deleted from the Recycle Bin, Advanced Disk Recovery can also recover data that has been lost due to corrupt partitions and format of the hard drive. The chances of data recovery are not 100% but are very high depending on the type of files and the method by which they were lost.

The Final Word On Disabling Recycle Bin On Windows 10
It is easy to permanently delete any file from your system and bypass the Recycle Bin with a tweak of settings. Once deleted the files can be restored too with specialized software but there is no 100% guarantee. I like the concept of a Recycle Bin acting as a middle man for deleted files. But if you still want to bypass it, you can follow the steps described above.
Follow us on social media – Facebook, Twitter, LinkedIn, and YouTube. For any queries or suggestions, please let us know in the comments section below. We would love to get back to you with a solution. We post regularly on the tips and tricks along with solutions to common issues related to technology.
Camila Saunders
What if after following this procedure, I am not able to recover the data. Do we have any software for recovering those files too?Dheeraj Manghnani
Hi Camila, To recover deleted files, you can always use Advance Disk Recovery. For more info, kindly visit the below link. https://wethegeek.com/how-to-recover-permanently-deleted-files-in-windows-10/