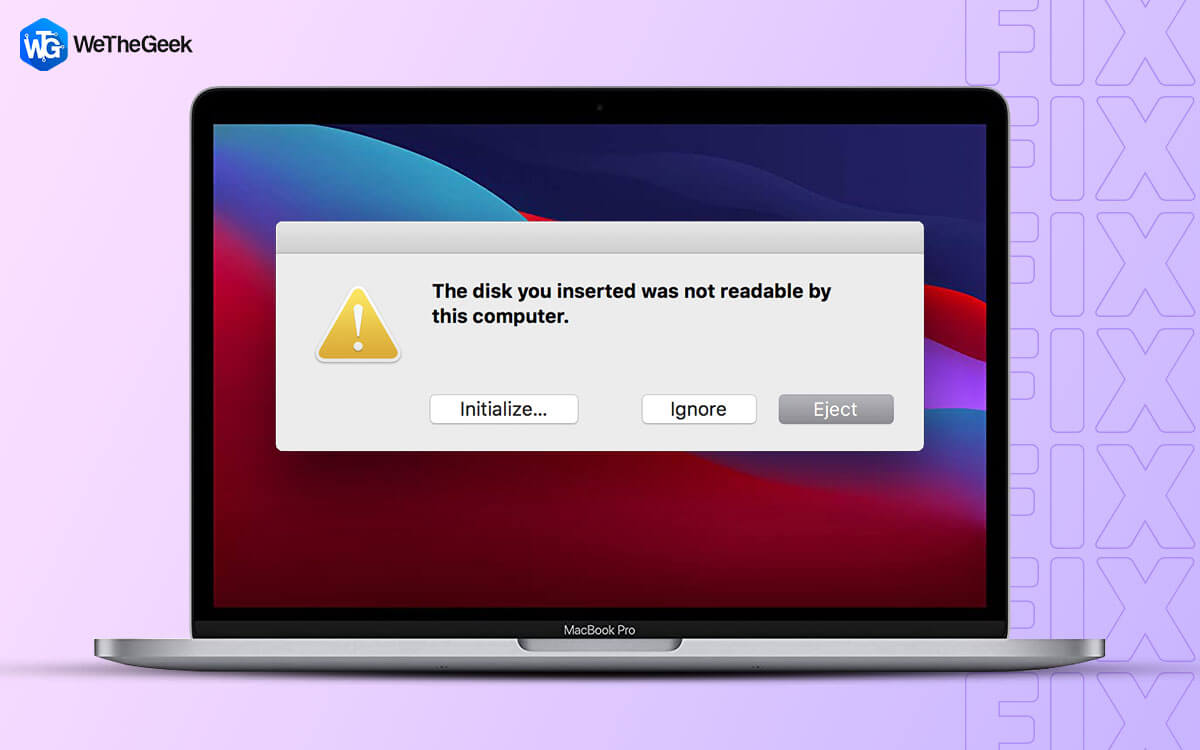
Is the attached disk not readable on your computer? In this blog, lets find out how to fix the disk you attached was not readable by computer error. Your friend wants to borrow your external hard drive for some time. However, before handing the drive over to him you want to transfer all personal photos, docs, and other data to your Mac. But the moment you plug it into your Mac, it returns “the disk you inserted was not readable by this computer”. This is a scenario that many Mac users have bumped into in the past and lately, with some macOS Big Sur users the situation is the same but with a different message -the disk you attached was not readable by this computer.
So, how on Earth are you going to fix the “the disk you attached was not readable by this computer” error considering that your dear friend would be on your doorstep anytime to collect the external hard drive. Before you say to your friend – “sorry pal! Can’t” and disappoint your friend, consider trying the following fixes –
How To Fix The Disk You Attached Was Not Readable By This Computer
1. Run A Preliminary Check On Your Mac
Your external hard drive/ SD card/ USB flash drive might be the issue –
Much before you try any advanced measures to deal with “the disk you inserted was not readable by this computer” here’s a very simple thing you can do. Plug in a different external hard disk on your Mac. If you can see it in your Finder, the problem lies with the hard disk you are trying to insert into your Mac.
2. Is The Disk Encrypted?
“Did I ever encrypt my external hard drive?”. Not just you, many users prefer safety over being sorry –
If for any reason, the data on the disk is encrypted or the disk in question per se is encrypted (using encryption software), you will not be able to access it and might get “the disk you inserted was not readable by this computer” in return. In that case, connect the drive, check for encryption, and if it is encrypted, right-click on it, click on Decrypt (drive name) and provide the password to decrypt it.
3. Convert The File System Format
Aargh, file system issues!
The device you are trying to plug into your Mac may be in NTFS format. The devices include USB flash drives, external hard disks, SD cards, etc. If that’s the case, format the device into a Mac-acceptable format such as FAT32. But, before you do that, make sure you backup your existing data because once you format your device, all the data will be gone.
4. Use The Disk Utility To Repair The Disk
Mac has a functionality using which you can repair or verify the disk that is unreadable. To do that, follow the steps mentioned below –
1. Click on Go
2. Head to Utilities
3. Choose the volume from the left-hand pane whose permissions you want to repair
4. Click on the tab that says First Aid
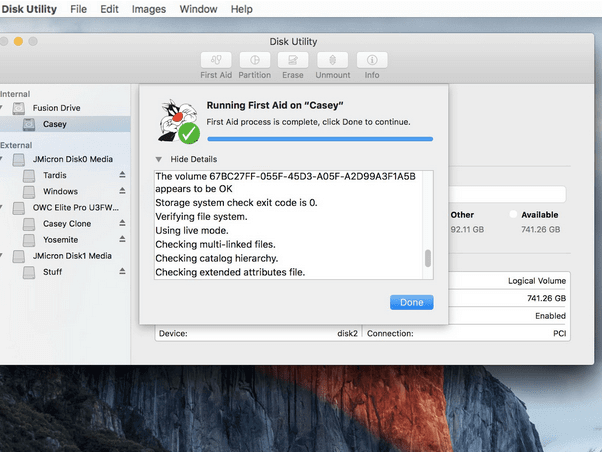
5. Click on Repair Disk
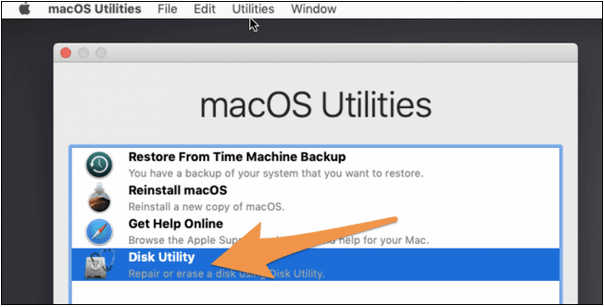
5. Initialize As The Error At Hand Tells You To Do
Here we’ll first look at how you can initialize the disk to resolve the “the disk inserted was not readable by this computer” issue on Mac and then we’ll further have a look at a great way to recover data –
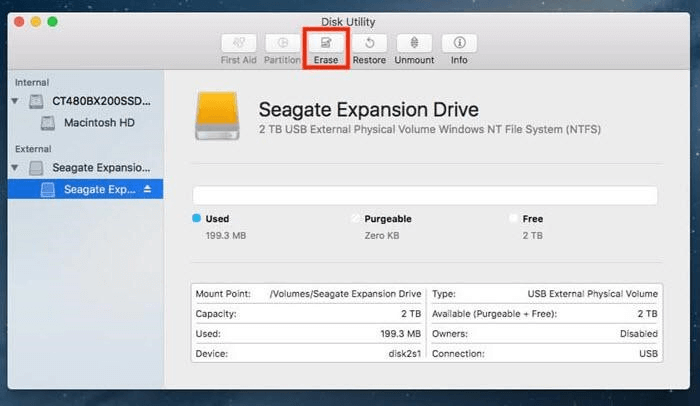
1. Click on Initialize
2. When the Disk Utility opens click on View and then click on Show All Devices
3. Choose the problematic drive from the left-hand side and then select erase
4. Select the File Format and then click on Erase
Once your drive has been formatted and initialized, your Mac should be able to read the disk. However, this will surface another issue – You will have lost all your data. But, don’t worry! Here is a way you can recover your lost data on Mac. You can use a data recovery utility like EaseUS Data Recovery Wizard for Mac.
What is EaseUS Data Recovery Wizard for Mac?
It is a professional tool for recovering lost data. And, it can tackle various issues because of which you might have lost data. These include accidental format, emptying the trash bin, mistakenly deleting data, and many others.
How To recover Data Using EaseUS Data Recovery Wizard for Mac?
1. Download, run and install EaseUS Data Recovery Wizard for Mac

2. Connect the drive to your Mac
3. Launch EaseUS Data Recovery Wizard for Mac
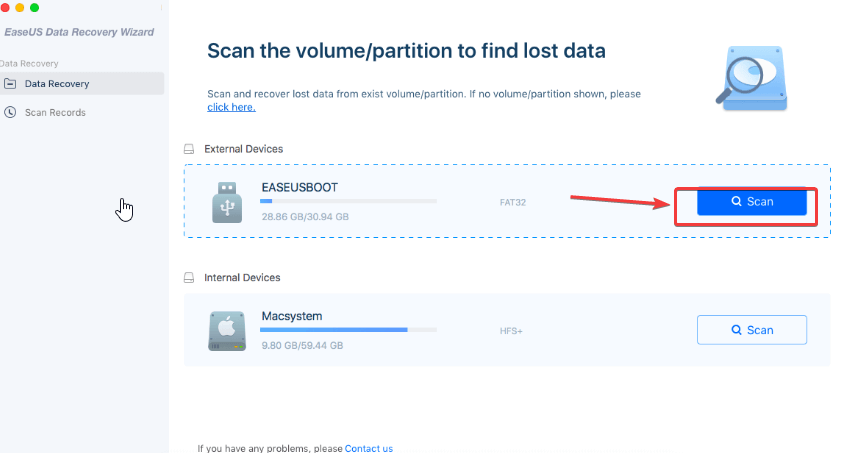
4. Select the drive and then click on the blue-colored Scan button
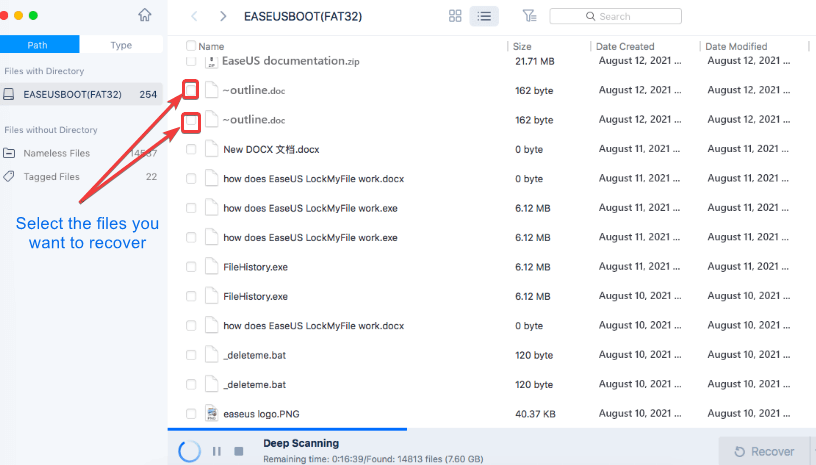
5. Depending on the mode of scan – Quick or Deep, you will be able to see the files that were lost
6. Select the files that you want to recover
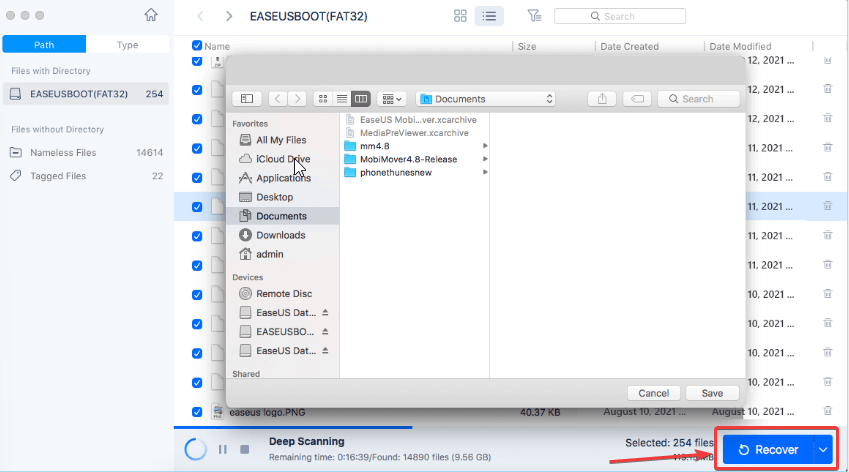
7. Once, you are done selecting, click on the Recover button. It is important to note that you do not select the same location from which your files were lost originally. This means you can select any other location other than the connected drive itself.
Wrapping Up
Try the ways mentioned above and let us know if you have been able to resolve “the disk you attached was not readable by this computer”. And, if you were or have been able to resolve the issue, we’d love to know in the comments which of the above solutions helped you fix the issue. For more such content, keep reading WeTheGeek.
Frequently Asked Questions
Q1. How do you fix the disk you inserted was not readable by this computer on Mac?
There are multiple ways to fix the “ disk you inserted was not readable by this computer on Mac” issue. We mentioned some of the effective ways to fix the issue at hand, however, solutions like repairing the disk or formatting the disk are the ones that have proved to be useful. We’d urge you to take a backup of your data before you opt for the latter solution.
Q2. How do you make a disk readable on a Mac?
The issue where a disk becomes unreadable on Mac occurs because of issues such as the format of the disk not being appropriate for Mac. In that case, you will have to reformat the disk that is acceptable by Mac such as APFS or ExFAT.
Q3. How do I fix a nonreadable hard drive?
To fix an unreadable hard drive on Mac, you will have to first understand the reason for the issue and then head to solutions such as checking the file system, conforming if there are any issues with the hard drive, initializing disk, formatting disk, etc
Q4. Why is the disk inserted not readable?
If your disk was not readable, it could be that there was a disk failure, a hardware issue, file system issues, or worse, there might be malware that is preventing your Mac from reading the disk.