
Just like humans need food and our car needs fuel, the same way our gadgets crave for battery! Agree or not but a major proportion of our time is spent with devices and technology, be it tablets, or laptops. And the most annoying thing at this point of time, is the “Battery running low, please plug into a power source immediately” message. We can’t blame our devices for this though!
We’re all familiar with Windows 10 environment. Microsoft has built a sophisticated detection system in Windows 10 which keeps a track of background applications and puts the CPU in the low power state. But that’s not it! The latest update of Windows offers you a new Power Throttling feature, which is quite advanced and helps preserve battery power of your Windows laptop or device remarkably. Let’s understand this new feature in detail.
What Is Power Throttling Mode?
The new Power Throttling mode in Windows 10 boosts the battery life significantly by taking care of less used apps in the background. If a particular application doesn’t seem imperative to the user, Windows marks it as accessible for Power throttling. At the point when these less important apps need to utilize the CPU, Windows places it in a low power state.
How To Use The Power Throttling Feature In Windows 10
To check processes which are Power Throttled on Windows 10 follow these quick steps:
- Right click on the taskbar and select “Task Manager”.
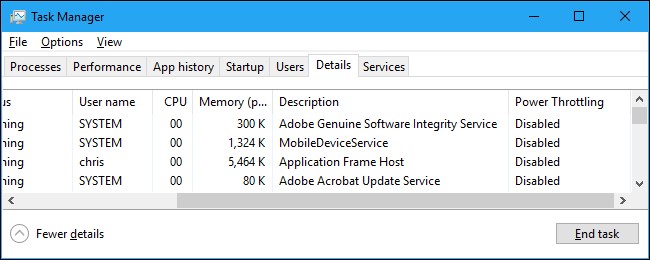
- In the Task Manager window, switch to “Details” tab.
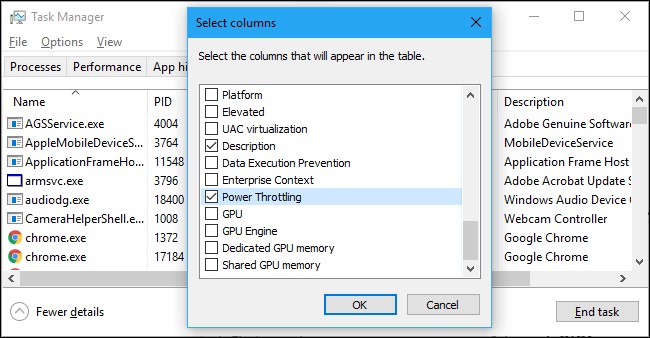
- Right click on any heading and tap on “Select Columns”.

- Scroll down through the list and enable the “Power Throttling” check box.
- Tap “OK” to save your changes.
- Now in the Task Manager window, you will see a new “Power Throttling” option which will display each app’s power throttle state.
- Here, you’ll see some applications listed as “Enabled” and “Disabled”.

How To Disable Power Throttling For Individual Apps
If you want to customize apps as per background processes follow these steps:
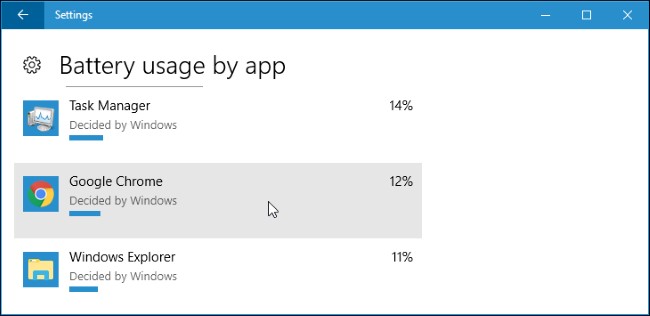
- Head to Settings > System > Battery. Now select “Battery Usage by App”.
- Select an application which you want to adjust.
- If you see “Decided By Windows” written underneath the app it implies that Windows is deciding whether the app has to be throttled or not.
- To disable Power throttling for an individual app click on the application name, then uncheck the “Let Windows decide” option and check on “Reduce the work the app can do when it’s in the background”.
- That’s all folks!
Here was a quick guide on understanding Power Throttling feature in Windows 10. Hope you learned something new today, feel free to share your feedback!