
If you are using the SteelSeries Engine software or hardware and find that it is not working as expected, then you need to probably reinstall the drivers for hardware issues. As far as software issues with SteelSeries Engine 3 not detecting, there are a few steps recommended by experts on gaming forums. This article is a compilation of all the best troubleshooting steps to fix SteelSeries Engine 3 now working in Windows 10.
How To Fix SteelSeries Engine 3 Not Working on Windows 10?
Method 1: Clean Boot
One of the reasons, as pointed out by experts, for SteelSeries Engine 3 not working is due to some sort of software conflict with another software running on your PC. The best method to check if this is the case is to do a clean boot on your PC which will restart your computer with the bare minimum and essential Microsoft services and apps.
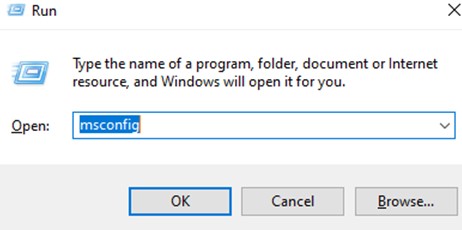
Step 1: Press Windows + R to make the RUN box appear and type MSCONFIG followed by Enter Key.
Step 2: Now click on the Services tab in the new box that appears and then click on the checkbox that is labeled as Hide All Microsoft Services.
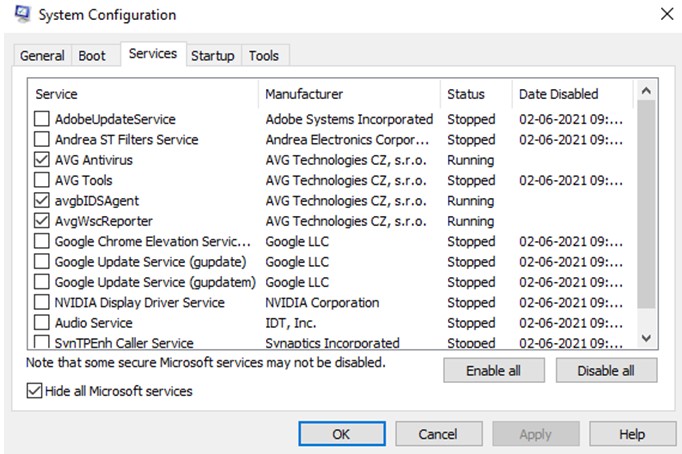
Step 3: You need to uncheck all the services that belong to different software only. Any service that includes Realtek, NVIDIA, Intel, Logitech, AMD, etc are hardware services and should not be unchecked. Click on Apply and then OK.
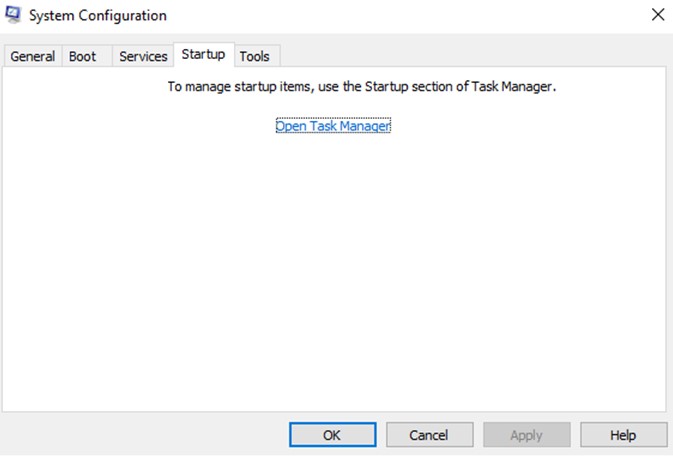
Step 4: Click on Startup Tab in the same box and then click on the Open Task Manager link.
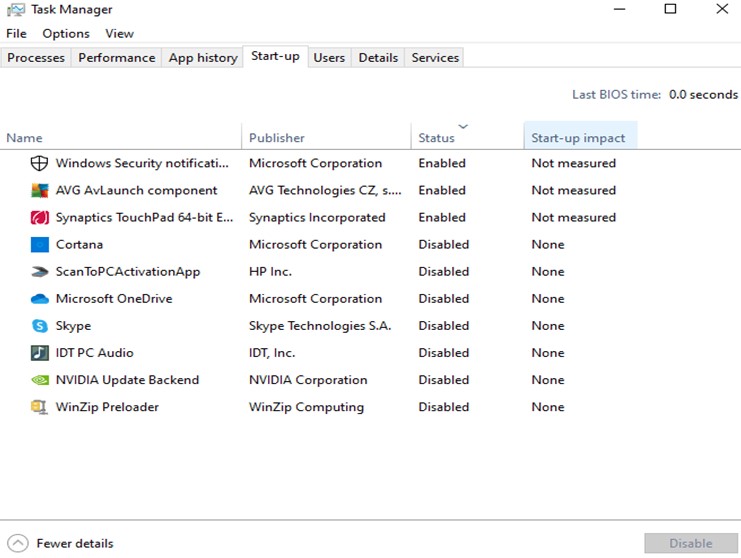
Step 5: These programs startup when your computer boots. You can right-click on the apps that you do not need and Disable them.
Step 6: Make a reboot and then check if the SteelSeries Engine not opening issue has been fixed.
Note: If the SteelSeries Engine issue has been fixed, then this indicates that one of the existing software in your PC is creating the conflict. You will have to manually turn on each application from the Services and Startup section and then check if the issue reoccurs.
Method 2: Install Windows Updates
All software releases updates that improve user’s experience and fix any existing bugs and Microsoft is no different. Windows 10 has been regularly receiving updates that improve the security and compatibility of the operating system. Here are the steps to update Windows 10 and fix steelseries engine 3 not working:
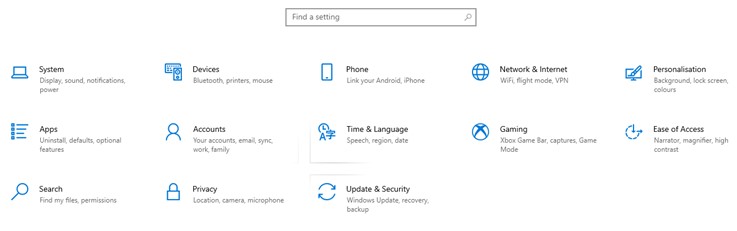
Step 1: Press Windows and I on your keyboard to open the Settings window.
Step 2: Locate Update & Security and click on it.
Step 3: Click on the Check For Updates button and wait until all the updates are complete.
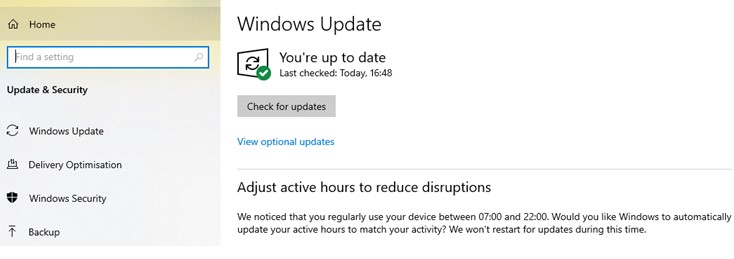
Note: Your system may restart automatically a couple of times.
Method 3: Reinstall SteelSeries Engine
Sometimes, errors that cannot be explained or the reason determined are simply solved by reinstalling the application. Before you attempt a reinstall, do not forget to uninstall the old version of the software. Follow these steps:
Step 1: Press Windows + R to invoke the RUN box and type appwiz. cpl.
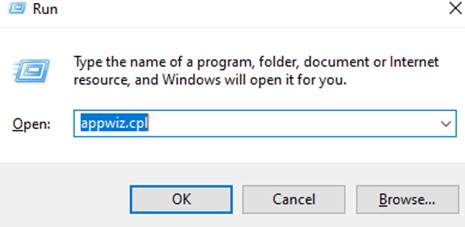
Step 2: A list of apps installed in your system will appear on your screen. Locate SteelSeries Engine 3 and right-click on it and choose Uninstall.
Step 3: Follow the instructions and remove the app from your computer.
Step 4: Visit the SteelSeries Official website and download the latest version of the application.

Step 5: Install the app and check if the SteelSeries Engine 3 not detecting issue has been resolved.
Method 4: Update Drivers
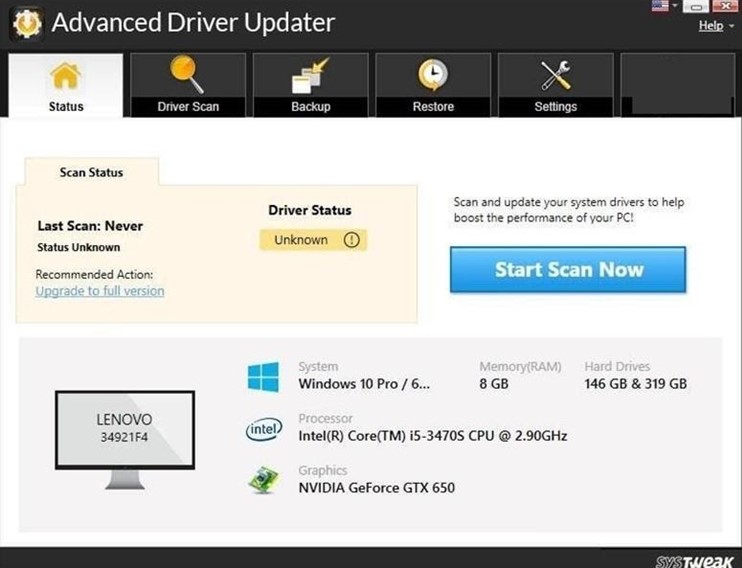
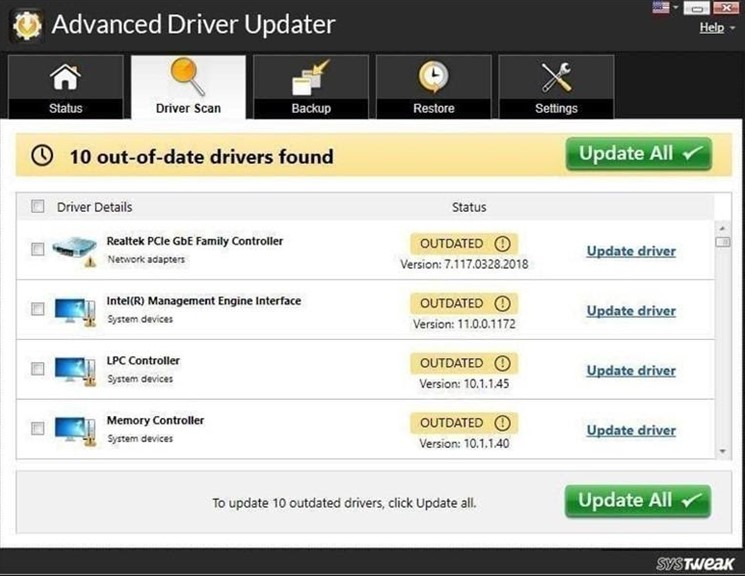
The final method recommended by experts to resolve the SteelSeries Engine not opening is to update the drivers. This can be done easily by using Advanced Driver Updater easily and in no time. The manual method of updating your drivers would require you to manually download and install each driver yourself. This task can be reduced to a few mouse clicks by using Advanced Driver Updater.
Step 1: Download Advanced Driver Updater from the link provided below.

Step 2: Begin the installation process by executing the file downloaded and follow the onscreen instructions.
Step 3: Launch the software open and click on the Start Scan Now button.
Step 4: The scanning process will begin on your computer and display the driver errors on your screen.
Step 5: Select the driver issue you wish to fix immediately and click on the Update driver link beside it.
Step 6: Once all the drivers are updated and fixed, close the software and reboot your computer.
The Final Word On How To Fix SteelSeries Engine 3 Not Working on Windows 10?
That concludes the journey on how to fix SteelSeries Engine not opening on Windows 10. These steps are recommended on gaming forums by various experts and have worked for many. You can try these steps and check if the issue has been resolved after successfully carrying out each method. Once the SteelSeries Engine 3 not detecting issue has been resolved then you can ignore the remaining steps. Follow us on social media – Facebook, Twitter, Instagram and YouTube.