
Windows 10 is by far the most advanced and beautiful looking version of Windows. It comes with a lot of features and tools. However, enabling a lot of features can also put you at risk of exposing your privacy and personal data being shared with Microsoft servers. No matter how safe and secure your data is, still you wouldn’t want some things to be shared. Moreover, enabling all your features can also drain your battery frequently and hamper the performance.
So, in this post, we have listed the things to disable in Windows 10.
1. Disable Wi-Fi Sense
A feature called Wi-Fi Sense comes with Windows 10. With WiFi Sense, your network passwords can be automatically shared with your friends on social media. It works both ways. The feature is enabled by default. With the feature enabled, your friends don’t need to ask the WiFi password from each other, as it will be shared automatically.
It sounds risky but it doesn’t share all the passwords but shares the ones that you have chosen.
Note: The password will only be shared if you have chosen it to be shared. When you share the password, they are safely stored on Microsoft’s servers.
Although, if you are one of them, who never wants to get their password shared with Microsoft, no matter how secure it is, then disabling this feature is a wise decision.
To disable WiFi Sense, follow these steps:
- Go to Start menu and locate Settings.

- Navigate it to Network & Internet.

- Now click Manage WiFi Settings from the upcoming page.
- You will get WiFi Sense options on top of the window. Disable all the options under it.
In this way, you would be excluded from Microsoft’s WiFi sharing program, although, your password might be stored remotely.
- To completely disable WiFi Sense, add “_optout” at the end of your SSID, (Wifi network’s name). You can do it by using router settings.
2. Disable Unwanted Background Apps
This is however not related to your privacy but has an effect on system’s performance and battery life. Some of Windows apps startup as soon as the computer turns on, and this can hog your system resources. To disable these background apps, follow these steps:
- Go to Start button and click Settings icon.
- You will Settings window, navigate to Privacy.

- Under Privacy, from the left-hand side panel, locate Background apps.

- You will get a list of apps, to disable just toggle the switch to the left.
3. Disable ‘Getting to Know You’ Features
One of the Windows 10 unnecessary services is ‘Getting to Know You.’ To literally getting to know a user better, Windows 10 saves your voice recordings, your typing history, gathers info from your calendar, contacts and more, to give you a better experience with Cortana. To disable ‘Getting to Know You’ feature, follow these steps:
- Go to Start menu and locate Settings.
- From the Settings app, navigate to Privacy.
- Now locate under Windows Permissions on the left-hand side panel, click ‘Speech, inking & typing’. You will get “getting to know me”.
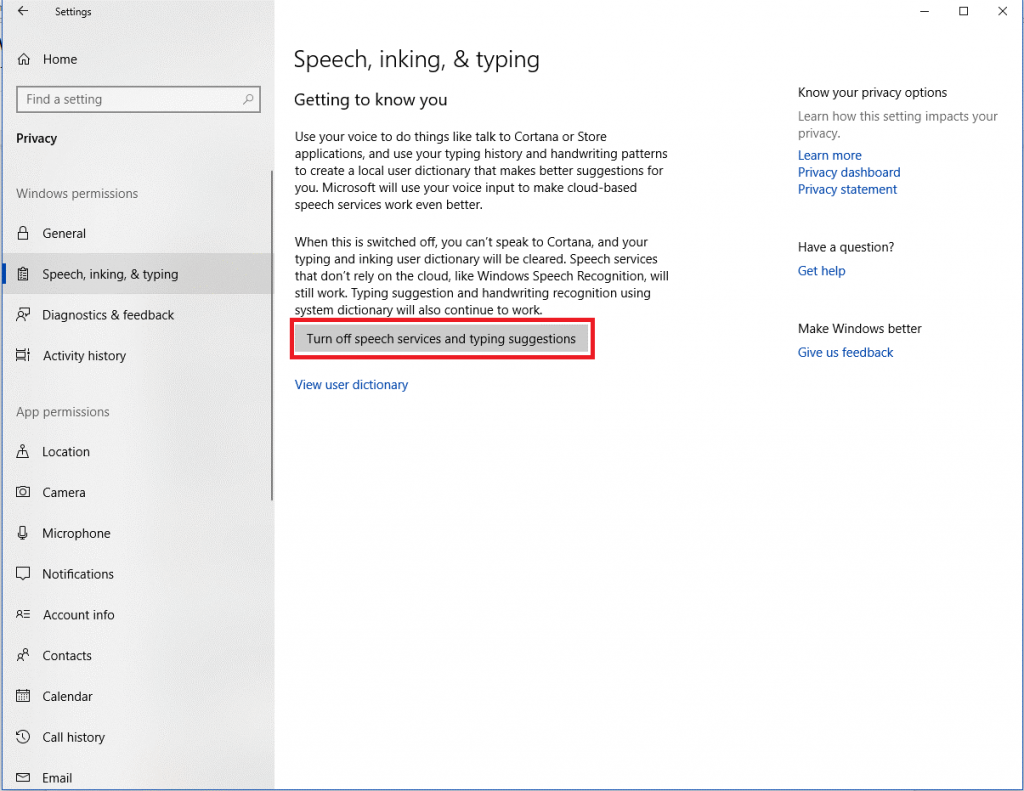
- Click ‘Turn off speech services and typing suggestions’.
4. Prevent App-Access to Your Location, Microphone, & Webcam
Windows 10 enables third-party apps to access your webcam, microphone & location. However, not all the apps actually need to access these for functionality. If you have allowed unnecessary apps to access your location or webcam, it could hamper the system performance and drain battery life. You should always know which apps have Location access. To know that, follow these steps:
- Go to Start menu and locate Settings.
- From the Settings app, navigate to Privacy.
- Under App Permissions from the left-hand side pane, click Location.

- You will get a list of apps you have access or can get access if permitted.

- If you want to block the location access, toggle the switch to the left beside the app.
- Once done, click Camera from the left-hand side of the panel and you will get a list of apps that can get access or have access to a webcam. Disable any of them which you don’t want should have access.


- On the Privacy window, look for Microphone, under App Permissions from the left-hand side pane.

- You will get a list of apps you have access or can get access if permitted.

- Toggle the switch to the left beside the app to disable the access.
5. Disable Targeted Ads
Windows 10 also comes with targeted ads to serve you better. In this case, you get a unique advertising ID. It is not possible to delete the ID permanently but you can stop third-party apps from accessing your data. To prevent, follow these steps:
- Go to Start menu and locate Settings.
- From the Settings app, navigate to Privacy.
- Under Windows Permissions, you will get General, click it.

- Toggle off the switch under the first option “Let apps use advertising ID to make ads more interesting to you based on your app usage” available on the right-hand side of the panel.
6. Disable Bandwidth Sharing for Updates
One of the things to disable on Windows 10, Bandwidth Sharing for Updates between users. Just like the torrent program, Windows uses peer to peer network for downloading updates. In other words, while downloading a Windows update file, you also upload parts of it to other users. To stop the bandwidth sharing updates, follow these steps:
- Go to Start menu and locate Settings.
- From the Settings app, navigate to Update & Security.

- On Windows Update window, click Advanced options.
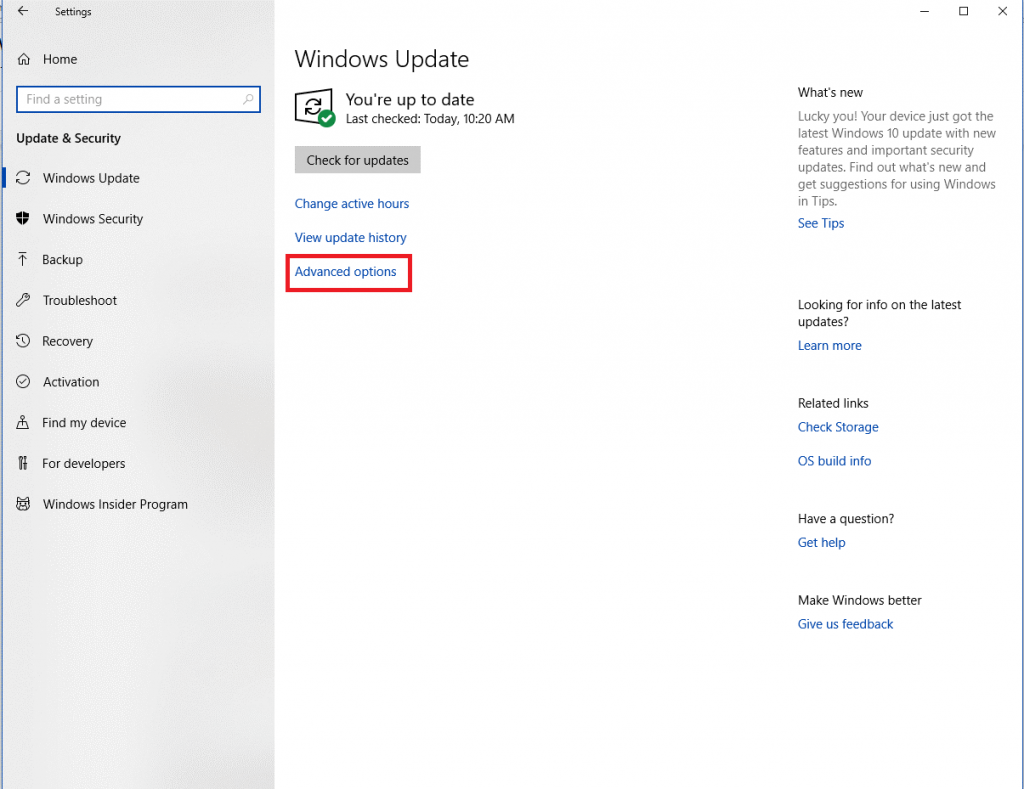
- From Advanced options window, click Delivery Optimization.

- On Delivery Optimization page, Under Allow Downloads from other PCs.

- Toggle the switch off to disable Allow Downloads from other PCs.
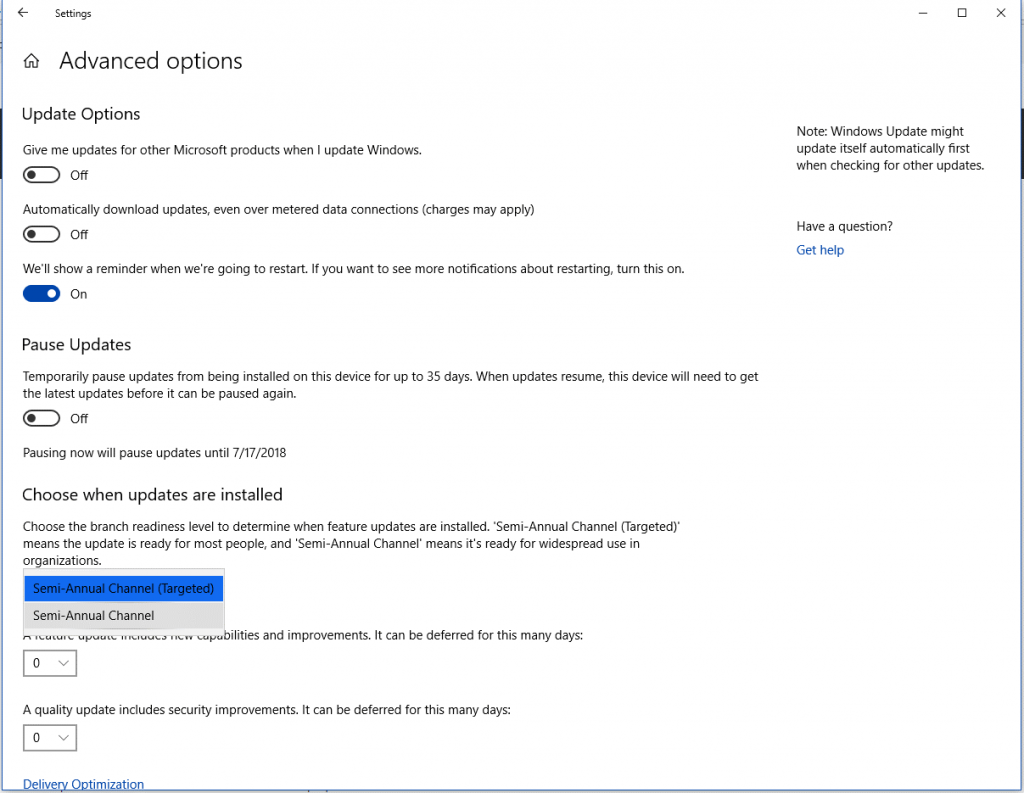
7. Regulate Updates Accordingly
If you are not comfortable with updates being automatically installed on your computer, then you can disable the same. To do that, follow these steps:
- Go to Start menu and locate Settings.
- From the Settings app, navigate to Update & Security.
- On Windows Update window, click Advanced options.

- On the Advanced options window, locate “Choose how updates are installed.”.

- From the drop-down menu, select Semi-Annual Channel.
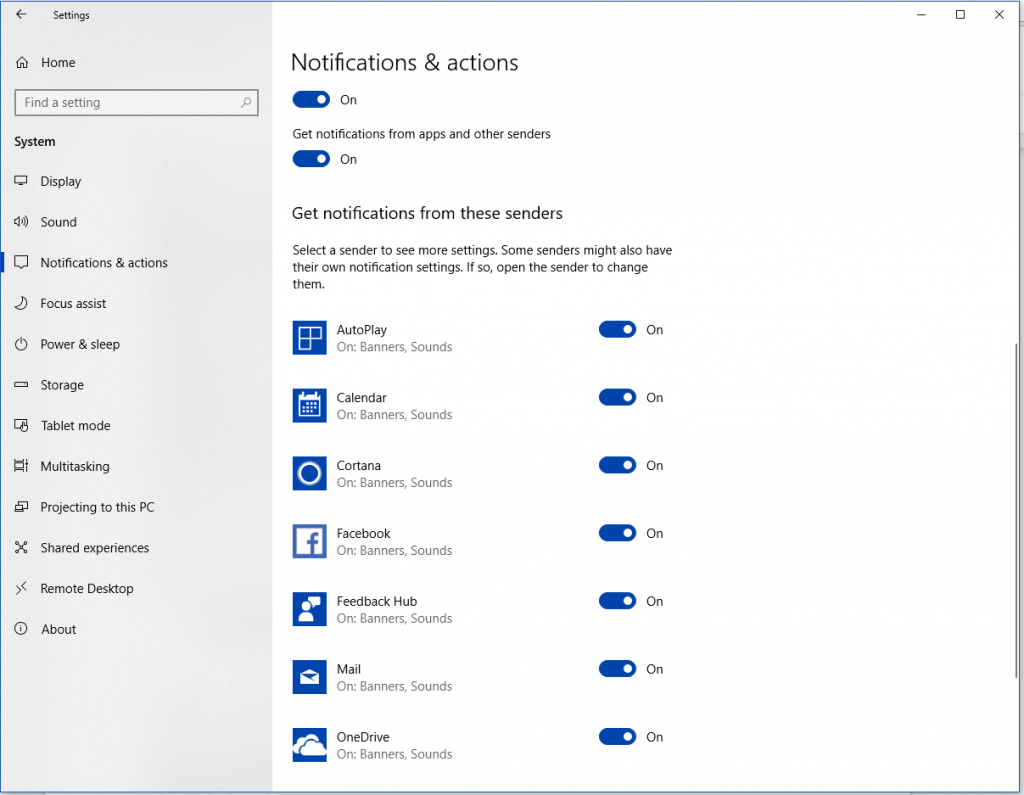
8. Disable Notifications on Windows 10
If you think notifications as Windows 10 unnecessary services, then you can disable them and improve the performance of your system as well. To disable, follow these steps:
- Go to Start menu and locate Settings.
- From the Settings app, click System.

- On the upcoming window, click Notifications & actions from the left-hand side of the panel.

- Scroll to get the list of apps and toggle the switch to the left to turn off notifications for the intended app.
So, these are some of the features or things to disable on Windows 10. Disable them and let us know if it impacted the system performance and gives you a sense of security.