
Google Drive is a platform which enables you to access your files, documents, pictures and videos anywhere and everywhere through a secure cloud storage. This is not it, it has more to it. It provides us up to 15 GB free storage, 100 GB for $2 a month or 1TB for $9.99 for a month. With Google Drive, you get online word processors, spreadsheets, and presentation, drawing, forms and many more.
Here are some of the tricks and tips to use Google Drive to the fullest.
- Attach Larger files to email via Drive –
Now sending a file up to 10 GB as an attachment is not a problem anymore. Wondering how? The maximum size of the attachment sent can’t be more than 25 MB but you can send files larger than that by attaching the files through Google Drive. The files get quickly upload irrespective of the size and you don’t need to upload the file again. Just select the files from Google Drive and send them.


- Work Offline –
One of the awe features of Google Drive, you can even see the files, photos or documents on your tablet or phone when you bad reception or you are on an airplane.
To do the magic, follow these steps –

- Locate settings on the Google Drive page and click on it.

- Click on Sync Google Docs, Sheets, Slides, Drawings files to this computer/device so that you can edit offline.
Now the documents will be saved to your mobile device/computer so you can view and edit it whenever you’re offline.
- Make Google Drive your default documents folder –
If you add or share files and documents from Google Drive frequently, then you should make it your default documents folder. It will save your time and will keep you away from all the hassles of selecting the documents from different places to send or share. To enable this feature, you need to follow a few steps –
- In windows –
- Right-click on your Documents folder and click Properties
- Click on Include a folder.
- Choose your Google Drive folder and select it.
- Click Set save location.
- In Mac –
- Open Terminal (in Utilities).
- Type cd Google\ Drive/. And hit return key,
- After that type In –s~/documents /documents.
- Hit return key and it is done.
- Save Online Content to Google Drive –
You might have come across the content that you wanted to save and access from anywhere. With Google Drive, it is possible. Enable the extension, ‘Save to Google Drive’ and save any content to it. You can save it as link or you can save the image as well.

- Know Google Drive Shortcuts to work efficiently –
Shortcuts will help you to work faster on Google Drive. You can access the keyboard shortcuts by clicking on Settings -> Keyboard Shortcuts. A pop-up window will appear and you will get the access to the shortcuts.

- Drag and Drop Files to Upload –

With Google Drive, uploading a file is not a big deal. You don’t have to click on ‘New’ Button and select the right option to upload, you can add the files by dragging and dropping them to the Google Drive interface.
7. Listen to Your Music Files –

Google Drive stores your audio files too and you can listen by downloading them anytime. However, if you don’t want to download, then enable Music Player for Google Drive Chrome extension and listen to your music on the extension interface.
See Also: 11 Best Google Chrome Extensions You Must Have
- OCR Technology for Images and PDFs –

Google Drive has Optical Character Recognition Technology to extract the text from images and PDF files. It is very simple to use. All you need to do is –
- Right-click on the image /PDF file in Google Drive.
- Click on Open With, you will get an option to open it with Google Docs.
This will open the image/PDF in Google Docs with text written below it. However, the extracted text may not be perfect, but it would be good enough if the image is clear.
See Also: Battle of Backup: iCloud Photos Vs Google Photos
- Add Google Drive to Windows ‘Send To’ Menu
If you frequently send e-mails and share data from Google Drive, then it must be very troublesome to open Google Drive to attach or share a document. So, to make the work easy, you can download and install Google Drive on your desktop.
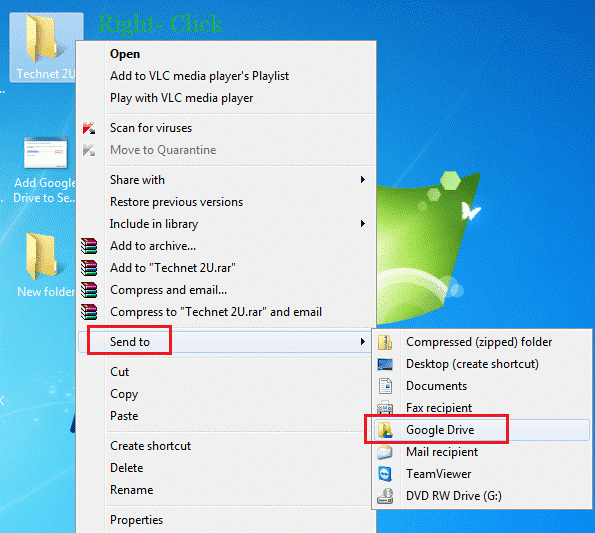
Once Google Drive is installed, navigate to Users > > AppData > Roaming > Microsoft > Windows > SendTo.
- Typing is not the only option, use Voice to command
Typing is not the only option to create a document, you can also use your voice and work on your document. It is way faster and easier than typing. All you need to do is –
- Open the document, you want to work on.
- Click on Tools-> Voice typing

- Scan images in a snap –
Install Google Drive on your Android phone and use it as a scanner. Tap on large plus icon, then choose Scan from the pop-up menu. You can rotate & crop images manually, can create multipage documents. The scanned documents are uploaded to Google Drive as PDFs.

- Control the Access Level–
While sharing a document, you can set an access level. You can set the access level from the four different levels provided. To set the level of access, right-click on the document and click on Share. You will get a pop-up windows.
Click on Advanced.
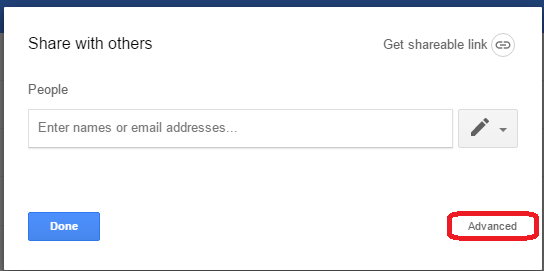
You will get another pop-up window. You can select the level of access from these options.

However, you (Owner) can do anything to the file—even delete it—and invite more colleagues.
See Also: Tidying Tips for A Smart Android User
- Revision History –
Google Drive helps you to go back in time, it keeps the older version of files just in case you need them. Follow these steps to get the recent version.
- Open a document- Spreadsheet, presentation.
- Click on File-> Revision History.
- In the right panel, click a timestamp to see an earlier version of a file. You can also see the people who edited the file, and the changes they made in the color next to their name.
- To see edits in more detail, go to the right panel, choose a revision, and click the Arrow.
Now, you have some tips and tricks on your sleeves, use them and ease your way out while working on sheets or sending e-mails. There might be some more tricks that you will come across while exploring, do let us know.