Screen recording is helping a lot of people both personally and professionally, whether they need to record their screen for YouTube videos or need to capture an important meeting or game to share on social media. As a result, the term “auto stop recording” is equally essential in this context. We have often promoted Advanced Screen Recorder software for screen recordings, including streaming services like Netflix and Prime. Many users wish to know how to stop their computer’s screen or audio recording automatically. We’ll go over step-by-step instructions for stopping screen recording at a specific time, duration, or file size.
Advanced Screen Recorder: A Screen Recorder With Multiple Features
Advanced Screen Recorder is the finest way to record your screen with clear HD quality and audio. This is a fantastic and powerful screen recorder with simple and clear controls. It includes fantastic and advanced screen recording functions that are rare, and it can be used by any rookie or expert user. The easy user interface allows you to record noises from the screen, system, or microphone, and to start, pause, or stop recording at any time. Advanced Screen Recorder combines all of these incredible features so that anyone can use it to its maximum potential. Here is a list of its features:
Video recording modes: Users can record the entire screen, a selected region, or a specific window with or without sound with this application installed on their computer.
Make Your Watermark: To personalize your video recordings, create a watermark and add it to screen recordings.
Use a webcam to record: To make a personal video, record footage from a camera or utilize a webcam overlay.
Take a screenshot of the screen: Capture a single window, region, selected window, or scrolling window during or after recording.
Make a recording of your voice: Using a microphone, record audio from the system as well as a voice-over, either concurrently or separately.
How to Stop Your Recording using Auto Stop Recording Feature
Disclaimer: Recording and/or sharing Streaming Video from any service may violate the terms of your agreement. Please refer to the Terms of Use before using this service.
Step 1: Download and install the program, or click the icon below.

Step 2: After the application has been installed, use the key that was emailed to you after your purchase to register it.
Step 3: Your application will be ready to use once you’ve completed the registration process.
Step 4: Once the App UI has loaded, there are a few things to take care of before you begin recording.
Step 5: Select the sort of watermark you want by clicking the Watermark option. Every time you record a video, you can utilize the Default Watermark, No Watermark, or create a new one.
Color, fonts, placement, and opacity are just a few of the variables to think about.
Step 6: The state of the Mouse Pointer during the recording is the next step in the procedure. In the app’s lower portion, click the Arrow symbol next to the Watermark area. You can choose whether or not to show the mouse pointer and click.
Step 7: Select the audio source by clicking the Microphone Button. If you wish to make a lesson video, choose Microphone; if you want to record the audio on your computer, choose Default Recording Device.
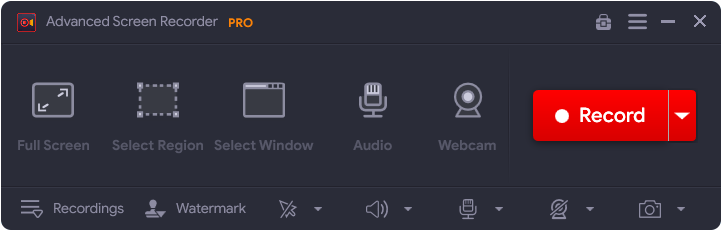
Step 8: Finally, choose one of the four options for screen recording.
Full Screen: This captures your computer’s entire screen.
Select Region: This option allows users to record only an area of their desktop screen, and only that portion will be captured.
Select window: The user can choose a single program or OS window to record activity in, and it will only record activity in that window.
Camera: You can record anything that is being streamed on your screen using your webcam.
Step 9: Before you begin the recording, click on the hamburger menu on the top right side of the app and choose Auto Stop from the dropdown menu.
Step 10: A new box will appear with various Auto Stop options.
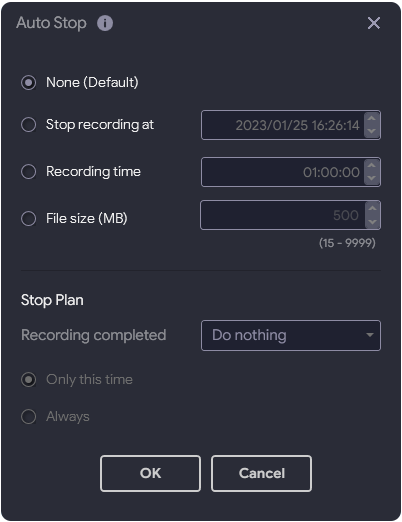
- Stop Recording At: When this option is selected, the recording will automatically stop at the time entered by the user. The time taken into consideration by the app is the same as the computer’s time.
- Recording Time: This helps screen recorders to plan on how long they want their recordings to be. You can set the time of the recordings in seconds, minutes, and hours.
- File Size (MB): If time does not matter to you but file size does. then this option is for you. You can select the file size of the final output file in MB and the recording will auto stop when your recording reaches that predetermined size.
- Stop Plan: Advanced Screen Recorder takes users one step forward by letting them decide what happens after the recording is automatically stopped. You can either let the application exit or even shut down your PC.
Step 11: Plan ahead of time what you want to record.
Step 12: After selecting a recording mode, press the Record Button. A new window with basic controls such as Pause, Stop, Time Duration, and Screenshot option will appear in the lower right corner.

Step 13: To stop recording, click the red square in the mini tray. The F9 key can also be used to stop the recording.
Step 14: When the recording is complete, select Open Recording Folder from the hamburger menu in the upper right corner of the screen.
Step 15: A new File Explorer window will open, including all of your screenshots and screen recordings.
Step 16: Press F11 on the keyboard to take a screenshot at any moment while the program is open.
Important: If you’re still having problems with black screens, before recording, make sure the hardware acceleration setting on your Google Chrome and Edge browsers is switched off. You can also use Mozilla Firefox, which does not appear to support this capability at the moment. You can disable this feature by going to Chrome’s settings and searching for Hardware Acceleration in the Settings Tab’s search box.
The Final Word On How To Stop Your Recording Using Auto Stop Recording Feature?
Advanced Screen Recorder is a great tool for capturing screenshots and recording your screen. This may be used to record online meetings, webinars, and almost anything else on your screen. It may also be used to take screenshots on a Windows PC. With capabilities like recording games, streaming videos, and recording remote desktop sessions, Advanced Screen Recorder is a must-have tool for your PC.
Follow us on social media – Facebook, Instagram, and YouTube. For any queries or suggestions, please let us know in the comments section below. We would love to get back to you with a solution. We regularly post tips and tricks, along with answers to common issues related to technology.